Is your WordPress website silently vulnerable to attackers? While you focus on creating content and growing your audience, critical files and directories might be exposing your site to serious security threats.
The humble .htaccess file is your first line of defense – a powerful but often overlooked security tool sitting right in your WordPress installation.
This guide will walk you through using .htaccess to lock down sensitive components including your wp-config.php file, wp-admin directory, and even control access to your media files and other assets.
Whether you’re a WordPress developer seeking advanced security implementations or a site owner looking for straightforward protection, you’ll find actionable techniques to fortify your website against unauthorized access and common attack vectors.
By the end of this guide, you’ll have implemented robust security measures that work silently in the background, protecting your site without affecting legitimate users.
Ready to secure your WordPress site properly? Let’s dive in.
What is .htaccess?
.htaccess (which stands for “hypertext access”) is a configuration file that sits within specific directories on your web server (running Apache). It allows you to configure settings for that directory and any subdirectories underneath it. Instead of modifying the main Apache server configuration (which usually requires higher-level access), you can use .htaccess files to make changes on a per-directory basis.
These changes can include things like setting up redirects, password-protecting areas, controlling caching, and, importantly for us, restricting access to files and folders.
Unlike main configuration changes, the beauty of .htaccess is that its changes take effect immediately without requiring a server restart. It is read on every request that hits the server for the directory in which it is located, so its directives are applied instantly.
📖 Suggested read: Protect Your WordPress Login pages with Cloudflare Zero Trust
Why Restrict Access to WordPress Files?
WordPress, like any complex web application, has a specific directory structure. Some files are meant to be publicly accessible (like your theme’s CSS and JavaScript files and images), while others are crucial to the functioning of WordPress and should never be directly accessed by the public. These sensitive files include:
- wp-config.php: This is the crown jewel. It contains your database credentials (username, password, database name), secret keys used for security, and other vital configuration settings. If a malicious actor gets hold of this, they could compromise your entire site.
- wp-includes/: This directory contains core WordPress files and libraries. Direct access to these files could expose vulnerabilities or allow attackers to inject malicious code.
- .htaccess itself: You certainly don’t want someone modifying your security rules!
- Other sensitive, non-web readable files, Such as backups, logs, or readme.html
Allowing direct access to these files is like leaving your front door unlocked and putting a sign on it saying, “Valuables inside!”
We restrict access to protect your WordPress site’s core functionality and sensitive data from being exploited.
Importance of Securing WordPress Files
Securing these files is paramount for several reasons:
- Preventing Database Compromise: As mentioned, wp-config.php holds your database credentials. Leaking these means attackers could gain full control of your database, allowing them to steal data, inject malicious content, or even delete everything.
- Blocking Code Injection: Direct access to core files (wp-includes/) could allow attackers to inject malicious PHP code. Your server could then execute this code, potentially creating backdoors, stealing user data, or defacing your website.
- Preventing Information Disclosure: Even if a file doesn’t contain directly exploitable code, it might reveal information about your WordPress installation, such as the version number or the plugins you use. This information can help attackers identify known vulnerabilities.
- Maintaining Website Integrity: By restricting access, you ensure that only WordPress itself, through its intended mechanisms, can interact with these critical files. This helps prevent accidental or malicious modifications that could break your website.
📖 Suggested read: The 6 Best WordPress Security Plugins (2022)
How to Restrict Access to WordPress Files Using .htaccess: Step-by-Step Guide
This guide will walk you through securing your WordPress files by modifying your .htaccess file. We’ll use RunCloud’s file manager for ease of access, but the principles apply regardless of how you edit the file (FTP, cPanel, etc.).
Step 1: Accessing Your .htaccess File (Using RunCloud File Manager)
- Select Your Server: Access your RunCloud dashboard and choose the server where your WordPress website is hosted.
- Select Your Web Application: Locate the web application corresponding to your WordPress site and click on it.
- Open File Manager: In the web application’s details, you’ll find a “File Manager” tab or button. Click on it to open the File Manager.
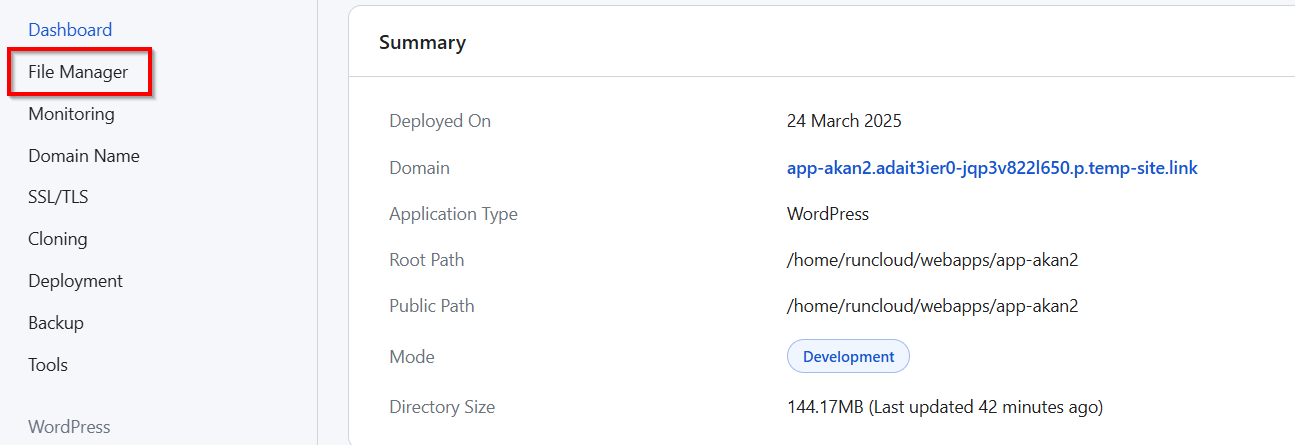
- Locate .htaccess: When you open RunCloud’s File Manager, you’ll land in your application’s root directory (typically located at webapps/<your-app-name>/). The .htaccess file should be visible among your WordPress core files. Don’t worry if you can’t see it immediately – some WordPress installations don’t have one by default, or it might be hidden.
If you need to create a new .htaccess file, simply right-click in the File Manager and select “Create New File.” Remember that the filename must begin with a period followed by “htaccess” with no file extension (.htaccess). This naming convention identifies it as a special configuration file that Apache will recognize and process when handling requests to your site.

Note: Files starting with a dot are often hidden by default in many file systems. If you are not using the RunCloud file manager, you might need to enable “Show Hidden Files” in your file manager’s settings.
Step 2: Adding Rules to Restrict Access
Always create a backup of your .htaccess file before making any modifications. This critical step cannot be overstated – even a minor syntax error can render your entire website inaccessible. The server reads this file for every page request, so any mistake will immediately affect your site.
To create a backup in RunCloud:
- Right-click on the .htaccess file
- Select “Download” to save a local copy, or
- Choose “Duplicate” to create a .htaccess.bak file directly on the server
Once you’ve secured a backup, you can safely edit the file by double-clicking it in RunCloud’s File Manager, which will open the built-in text editor.
Below are several common security scenarios and the corresponding .htaccess rules you can implement. Each addresses specific vulnerabilities in a standard WordPress installation:
Use Case 1: Restrict Access to wp-config.php
As explained above, you should protect your wp-config.php file from unauthorized access. This directive denies access to the wp-config.php file from all sources.
<Files wp-config.php>
    Order allow, deny
    Deny from all
</Files>
📖 Suggested read: 10 Security Tips to Secure VPS Server in 2025 [Ultimate Guide]
Use Case 2: Limit Access to the wp-admin Area by IP Address
This is useful if you want to restrict access to your WordPress admin area to only specific IP addresses (e.g., your office or home network). Replace YOUR_IP_ADDRESS with your actual IP address. You can add multiple Allow from lines for additional IPs.
<IfModule mod_authz_core.c>
<Location /wp-admin>
        Require ip YOUR_IP_ADDRESS
        # Require ip ANOTHER_IP_ADDRESS  (Add more lines as needed)
</Location>
</IfModule>
<IfModule !mod_authz_core.c>
<Location /wp-admin>
       Order deny, allow
       Deny from all
       Allow from YOUR_IP_ADDRESS
       # Allow from ANOTHER_IP_ADDRESS  (Add more lines as needed)
</Location>
</IfModule>
In the above code snippet, the Location /wp-admin directive applies the rules specifically to the /wp-admin directory.
Note: The syntax of these commands might vary slightly depending on the Apache version you are using. Refer to the official documentation for the latest syntax.
📖 Suggested read: How to Restrict WordPress Admin Access by IP Address? (EASY GUIDE)
Use Case 3: Protect Media Files from Direct Access (but allow them to be displayed on your site)
This prevents direct access to files in your wp-content/uploads directory (where images and other media are stored) unless the request is coming from your own website. This helps prevent “hotlinking” (other sites using your images directly, consuming your bandwidth). Replace runcloud.example.com with your actual domain.
RewriteEngine on
RewriteCond %{HTTP_REFERER} !^$
RewriteCond %{HTTP_REFERER} !^http(s)?://(www\.)?RunCloud.example.com [NC]
RewriteRule \.(jpg|jpeg|png|gif)$ - [NC,F,L]
Let’s break down the above commands and try to understand them one by one:
RewriteEngine on: Enables the rewrite engine, which is used for URL manipulation.RewriteCond %{HTTP_REFERER} !^$: This condition checks if the HTTP_REFERER header is not empty. The HTTP_REFERER header indicates the page that is linked to the requested resource.RewriteCond %{HTTP_REFERER} !^http(s)?://(www\.)?runcloud.example.com [NC]: This condition checks if the HTTP_REFERER does not start with your domain name (with or without www and with either http or https). [NC] means case-insensitive.RewriteRule \.(jpg|jpeg|png|gif)$ - [NC, F, L]: This rule gets applied if both of the above conditions are true. It matches any file ending in .jpg, .jpeg, .png, or .gif. The – means no substitution is performed. [NC, F, L] flags: NC means case-insensitive, F means Forbidden (return a 403 error), and L means this is the last rule to be processed.
Use Case 4: Block XML-RPC to Prevent DDoS Attacks
XML-RPC is a WordPress feature that allows remote access to your site. It can be a target for DDoS attacks. If you don’t need it, it’s best to block it. The security experts at Patchstack have written a great article that explains why blocking XML-RPC is a great idea.
<Files xmlrpc.php>
    Order allow, deny
    Deny from all
</Files>
📖 Suggested read: How to Block IP Address Using WordPress .htaccess File to Stop Bad Visitors
Use Case 5: Restrict Access to Sensitive File Types for Enhanced Security
Many crawlers and automated robots try to access files directly from the server, even if they aren’t indexed. In our previous post, we explained that robots.txt is merely a suggestion and not enforceable. Therefore, you should always block direct access to various potentially sensitive file types.
Use the following command to block sensitive files that will never be accessed over the web:
<FilesMatch "\.(sql|md|log|txt|backup|bak|conf|dist|fla|psd|ini|sh|inc|swp|aspx)$">
    Order allow, deny
    Deny from all
</FilesMatch>
In the above directive:
<FilesMatch ...>: uses a regular expression to match multiple file extensions.\.(sql|md|log|txt|backup|bak|conf|dist|fla|psd|ini|sh|inc|swp|aspx)$It will deny access to the listed file extension. You should carefully review this list of extensions and modify it depending on your use case.
📖 Suggested read: Redirect to HTTPS Using htaccess Behind NGINX Proxy
Use Case 6: Control Access to Configuration Files by Specific IPs
Similar to limiting access to wp-admin, you can restrict access to other configuration files (or any file/directory) to specific IP addresses. This example shows how to protect a hypothetical config.ini file:
<Files config.ini>
<IfModule mod_authz_core.c>
           Require ip YOUR_IP_ADDRESS
           # Require ip ANOTHER_IP_ADDRESS
</IfModule>
<IfModule !mod_authz_core.c>
        Order deny, allow
        Deny from all
        Allow from YOUR_IP_ADDRESS
        # Allow from ANOTHER_IP_ADDRESS
</IfModule>
</Files>
📖 Suggested read: How to Fix a 403 Forbidden Error on Your Site
Use Case 7: Disable Directory Browsing
Your WordPress site’s file structure is a treasure map for attackers. When directory listing is enabled, anyone who navigates to a folder without an index file can see a complete inventory of its contents. This exposes your site’s architecture, plugin versions, themes, and potential vulnerabilities – all valuable intelligence for malicious actors.
Automated scanning bots constantly probe websites for these open directories, looking for paths to exploit. Once they discover unprotected directories, attackers can identify outdated components, locate configuration files, or find other security weaknesses to target.
By disabling directory browsing, you force these requests to return a “403 Forbidden” error instead of displaying your folder contents. This simple change significantly strengthens your security posture by keeping your site’s internal structure hidden from prying eyes.
Options -Indexes📖 Suggested read: How to Fix the HTTP Error 503 Service Unavailable in 2025 [SOLVED]
Use Case 8: Restrict Access to the .htaccess File to Protect Configuration Settings
Your .htaccess file is not just a security tool – it’s also a potential security liability. If attackers can access this file, they gain valuable intelligence about your specific protection measures, allowing them to craft precisely targeted attacks that circumvent your defenses.
Think of your .htaccess as the blueprint for your security system. When exposed, it reveals exactly which files you’re protecting, which directories you’ve restricted, and what specific countermeasures you’ve implemented. Armed with this information, attackers can methodically test for weaknesses or exceptions in your ruleset.
To prevent this risk, you should explicitly block access to the .htaccess file itself. This creates a security loop where the very rules that protect your site also protect themselves from being discovered. By implementing this protection, you ensure that your defense strategies remain confidential, significantly reducing the attack surface available to potential intruders.
<Files ~ "^\.ht">
    Order allow, deny
    Deny from all
    Satisfy All
</Files>
Step 4: Testing Your Configuration
After saving your changes to .htaccess, it’s essential to test them thoroughly:
- Clear Your Browser Cache: Your browser might cache old versions of files or responses. Clear your cache to ensure you’re seeing the effects of your changes.
- Try Accessing Restricted Files: Attempt to directly access files you’ve restricted (e.g., runcloud.example.com/wp-config.php) in your browser. You should receive a 403 Forbidden error.
- Verify Website Functionality: Browse your website thoroughly to make sure everything is still working as expected. Pay close attention to areas that might be affected by your changes (e.g., the admin area and image display).
- Check for Errors: If anything is broken, check your browser’s developer console (usually accessed by pressing F12) for error messages. These messages can provide clues about what might be wrong.
- Revert if Necessary: If you encounter problems, immediately restore your .htaccess file from the backup you made in Step 2.
Final Thoughts: Securing Your WordPress Site with RunCloud and .htaccess
Throughout this guide, we’ve explained the role of the .htaccess file in securing your WordPress installation, focusing on restricting access to sensitive files and directories. While the concepts might seem technical at first, implementing these security measures is significantly easier with a hosting provider like RunCloud.
RunCloud’s platform is built with performance and security in mind. It’s designed to make server management accessible to anyone, even non-server administrators.
Let’s recap how RunCloud streamlines the process and enhances security:
- Easy File Management: RunCloud’s built-in File Manager provides a user-friendly interface for accessing, editing, and managing your .htaccess file directly without needing to use SSH or FTP. This significantly simplifies the process of implementing the security measures we’ve discussed. You can easily create backups, edit the file, and revert changes if needed, all within your RunCloud dashboard.
- NGINX and Apache Hybrid Options: RunCloud allows you to choose between NGINX or an Apache hybrid configuration. NGINX is known for its speed and efficiency, especially in handling static content. While NGINX doesn’t natively use .htaccess files, RunCloud cleverly handles configurations through its interface, translating many .htaccess-like directives into NGINX-compatible rules.
- Built-in Security Features: Beyond .htaccess management, RunCloud offers a comprehensive suite of security features:
- Web Application Firewall (WAF): RunCloud’s WAF helps protect your site from common web attacks, such as cross-site scripting (XSS) and SQL injection. The WAF also handles many of the protections we achieve with .htaccess (like blocking malicious requests) at a higher level.
- Server-Level Security: RunCloud automatically configures your server with security best practices, including firewall rules, intrusion detection, and regular security updates.
- SSL/TLS Certificates: RunCloud makes installing and managing free Let’s Encrypt SSL/TLS certificates incredibly easy, ensuring secure communication between your website and its visitors.
- Web Application Firewall (WAF): RunCloud’s WAF helps protect your site from common web attacks, such as cross-site scripting (XSS) and SQL injection. The WAF also handles many of the protections we achieve with .htaccess (like blocking malicious requests) at a higher level.
- Git Deployment: By deploying with Git, you eliminate the need for FTP, a very insecure protocol.
While understanding the power of .htaccess (and its equivalent configurations in NGINX) is valuable, RunCloud simplifies many of these tasks, allowing you to focus on building your website rather than getting bogged down in complex server configurations.
FAQs on Restricting Access to WordPress Files Using .htaccess
What is the difference between .htaccess and wp-config.php?
The .htaccess file is an Apache web server configuration file that controls access and behavior for its directory and subdirectories. It allows for per-directory settings without modifying the main server configuration.
wp-config.php, on the other hand, is a core WordPress file containing your database credentials, security keys, and other crucial WordPress-specific settings. RunCloud simplifies managing both, allowing easy access and editing via its file manager.
Can I restrict access to specific users?
.htaccess primarily restricts access based on IP addresses, not individual WordPress user accounts. You can allow specific IP addresses to access certain areas (like wp-admin), effectively limiting access to users coming from those locations. You’ll need to use WordPress’s built-in roles and capabilities system or a dedicated security plugin for user-level restrictions within WordPress.
What happens if I break my .htaccess file?
A broken .htaccess file, usually due to syntax errors, can cause a 500 Internal Server Error, making your entire website (or parts of it) inaccessible. Always back up your .htaccess file before making changes. RunCloud’s file manager makes it easy to create backups and revert to previous versions if something goes wrong.
How can I restore my .htaccess file?
Before making any changes, always download a copy of your .htaccess file or create a copy within your file manager (e.g., .htaccess.bak). If you encounter issues, simply replace the broken .htaccess file with your backup copy using RunCloud’s file manager, FTP, or any other file access method. This will quickly restore your site’s functionality.
Are there plugins that can help with .htaccess?
Several WordPress security plugins (like Wordfence, Sucuri Security, and iThemes Security) offer features to manage and modify your .htaccess file, often with a user-friendly interface. However, it’s crucial to understand the changes these plugins make, as incorrect configurations can still cause problems. With RunCloud, you can use plugins or manually edit your .htaccess.
Is it necessary to restrict access to WordPress files?
Restricting access to sensitive WordPress files like wp-config.php and core directories is a highly recommended security practice. It prevents unauthorized access, protects your database credentials, and reduces the risk of code injection and other attacks. RunCloud, combined with proper .htaccess rules, provides a strong foundation for WordPress security.
Can I restrict access to media files in WordPress?
Yes, you can use .htaccess to control access to media files (images, videos, etc.) in your wp-content/uploads directory. This is commonly used to prevent hotlinking (other websites directly linking to your images and using your bandwidth). RunCloud’s easy file management allows you to implement these restrictions.
How do I know if my .htaccess rules are working?
After saving your .htaccess changes, clear your browser cache and try to access the files or directories you’ve restricted directly. You should receive a 403 Forbidden error if the rules are working correctly. Also, thoroughly browse your website to ensure all intended functionality remains unaffected.


