RunCloud uses Redis Access Control Lists (ACL) to add an extra layer of security to your web applications. This feature helps control who can access your Redis database and what actions they can perform.
This guide explains how RunCloud uses ACL in Redis to protect your web applications. We’ll cover the entire setup process for both new and existing servers, as well as how to manage Redis ACL for your web apps.
Why Securing Redis Is Important
By default, Redis does not have any authentication, which means anyone who has access to your Redis database can read and write information.
By using ACLs (Redis Access Control Lists) and securing Redis, you can:
- Prevent unauthorized access to your Redis data.
- Protect sensitive information in your Redis instance.
- Ensure only authorized clients can execute specific commands.
Note: Redis Object Caching and Full-Page Caching are separate. Redis authentication does not work for Full-Page Caching. In this guide, we are focusing on Redis Object Caching, the most useful and widely used form of caching for high-traffic websites on RunCloud. We recommend securing your Redis Object Cache using the methods outlined here for production use if you use more than one web application per server and wish to take additional measures to reduce the risk of one site being able to affect other sites on your server.
Disclaimer: For users who have previously configured Access Control Lists manually on their systems, it’s important to note that these custom configurations may conflict with our automated ACL setup. To ensure smooth integration and avoid potential issues, we strongly recommend reverting any manually configured ACLs to their default settings before implementing our ACL solution.
Steps To Secure Redis
There are two primary methods you can use to secure Redis:
Step 1 – Enable Redis Password
This method involves setting a global password that any client must provide before accessing the Redis instance.
Suitable for: A single-site setup (one site per server) where straightforward security mechanisms are sufficient.
Advantages:
- Easy to implement: Just set a single password in the redis.conf file.
- Provides a basic level of security: This method implements a basic level of protection suitable for less complex environments.
Disadvantages:
- A single password: All clients use the same password, which could be a security risk in the event that it is compromised.
- Limited granularity: You can’t specify different permissions for different users.
Redis Password Setup For New Servers
Good news! If you’ve just connected a new server to RunCloud After the 27th of August 2024, then RunCloud will automatically enable the Redis password for you.
Note: The minimum agent version is 2.8.9+8, and the minimum version of RunCloud Hub required is 1.4.6. Redis ACL is only available for Redis version 6 and above.
Redis Password Setup For Existing Servers
For existing servers you manage using RunCloud, you’ll need to set up the Redis password manually from the RunCloud dashboard. Here’s how:
- Log in to your RunCloud dashboard and click on the server for which you want to enable the Redis password.
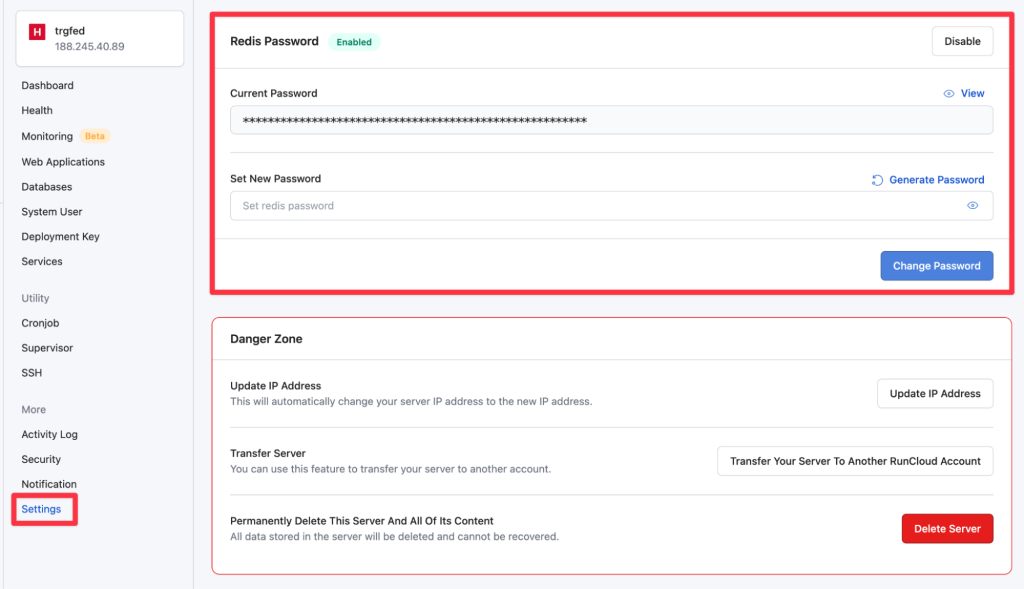
- In the left sidebar, click on “Settings” and scroll down to the “Redis Password” section.
- Enable the Redis password by toggling the switch.
- Once you enable the Redis password, your RunCloud dashboard will refresh and show you an option to update this password.
Step 2 – Using Access Control Lists (Optional but Recommended)
Redis ACLs allow for more granular control by defining multiple users with different permissions. This is the recommended method to protect your Redis database and is enabled by default for new web applications on RunCloud.
Suitable for: Multiple websites per server, or environments in which different applications share the same Redis instance and require distinct access controls.
Advantages:
- Granular control: Define multiple users with different passwords and permissions.
- Role-based access control: Assign specific commands and key access to different users.
- Enhanced security: Provides a higher level of security suitable for complex environments.
Disadvantages:
- Management overhead: Managing multiple users and permissions can be more complex, but RunCloud makes it easy to manage with only a few clicks.
Redis ACL for New Web Apps
When you create a new web app in RunCloud, Redis ACL is automatically set up for you. This means your new web apps are protected right from the start.
Redis ACL for Existing Web Apps
If you created a web application before the Redis ACL feature was available in RunCloud, then you will need to configure it manually:
- Navigate to the “Web Apps” section in your RunCloud dashboard and select the web app you want to update
- In the left sidebar, click on “Settings” and scroll down to the “Redis ACL” section
- Click on the “Create Redis ACL” button to create new Redis credentials. This will refresh your web page and present you with a new Redis ACL section.
- Here, you can view the username and password for your Redis ACL. This password is automatically generated, and you can use it to connect to your Redis database manually.

RunCloud Hub and Redis ACL for WordPress Object Caching
RunCloud Hub users can enable Redis caching for WordPress sites from the RunCloud dashboard. This simple process takes only a few clicks and helps secure your site without sacrificing speed or security.
All newly installed WordPress sites will automatically have Redis ACL enabled, but if you deployed your site before this feature was available, then you can simply navigate to the RunCloud Hub page for your WordPress application in your RunCloud dashboard, and scroll down to see if Redis Object Cache has been enabled. If it is disabled, you can simply click on “Enable” to turn it on.

After enabling Redis caching, you can go back to the WordPress dashboard and see that it is now active on your site.

Troubleshooting Redis ACL on OLS servers
If you are using OpenLiteSpeed server stack on RunCloud, then you might run into a few errors depending upon the version of the RunCloud agent which was used to deploy your site. But don’t worry, you can quickly fix this by editing your wp-config.php file and adding the following snippet:
define('LSOC_PREFIX', 'application-name-rcredis:');In the above snippet, don’t forget to replace the application-name with the name of your application. Subsequently, you need to make sure that you add -rcredis: after the name of the application to complete the prefix.
For example, if the name of your application is bookbits then the resulting code snippet would be as follows:
define('LSOC_PREFIX', 'bookbits-rcredis:');After adding the code snippet to your wp-config file, save it and refresh the site for the changes to take effect.
Troubleshooting Redis Connection Issues in Containerized Environments
If you are manually upgrading the containerized servers, then you might encounter the following errors: “Redis Object Cache issue – Redis is not connected! Please check Redis service in your server or disable Redis object cache.” In this case, restarting Redis temporarily fixes the issue, but the connection drops again soon after.
The issue is typically caused by missing configuration lines in the Redis configuration file (/etc/redis/redis.conf).
If you’re experiencing Redis connection issues in a containerized server environment, follow these steps to resolve the problem:
- Access your server via SSH and locate the Redis configuration file which is present at
/etc/redis/redis.conf. Next, run the following commands to back up the existing configuration file and then open it in a file editor:
sudo cp /etc/redis/redis.conf /etc/redis/redis_old.conf
sudo nano /etc/redis/redis.conf- Locate the line that starts with
requirepass. This line sets the Redis password. - Make sure that the following configuration lines are present immediately before the
requirepassline. If the following lines are absent, you can manually add them by copying the following snippet and pasting into your config file:
bind 0.0.0.0
port 6379
protected-mode no
tcp-backlog 4096
timeout 0
tcp-keepalive 300
daemonize yes
pidfile /run/redis.pid
supervised auto
loglevel notice
logfile /var/log/redis/redis-server.log
databases 16
dir /var/lib/redis
always-show-logo yes
stop-writes-on-bgsave-error yes
rdbcompression yes
rdbchecksum yes
dbfilename dump.rdb
rdb-del-sync-files no
maxmemory-policy volatile-ttl- Save the file and exit the text editor.
- Restart the Redis service using the following command to apply the changes:
sudo systemctl restart redis-server- Monitor your web application to ensure the Redis connection remains stable.
If you continue to experience issues after applying these changes, please contact our support team for further assistance.